HOSTED CALL FLOW GUIDE
Keep your business connected
Keeping your business connected is easy thanks to the Hosted Call Flow manager in my.plan. Now you can easily connect any one of your Hosted phone numbers with an extension, Ring Group, Call Queue, IVR… in fact any number of our Hosted features.
But it doesn’t stop at set up. Flexibility is everything! You can also easily and instantly manage calls to go to different people whenever your business landscape or resources change. And with enterprise-grade Call Flow components such as Time of Day routing and IVRs, you can automate your Call Flow to work around your business and people.
This guide gives you a brief introduction to Call Flows and should help you to understand what each feature does and how it can improve your business and the customer experience
—
Put simply, a Call Flow is the journey a call takes from an incoming number being dialled to the call being answered. This can be as simple as someone dialling one of your numbers and a phone ringing on someone’s desk.
Taking this to the next level, you may want to ensure that a call never goes unanswered. You might want someone’s phone to ring and then try someone else after a few seconds and then try someone else… you get the idea.
However, the journey doesn’t stop there. You might want a group of phones to ring, pre-recorded messages to keep customers informed, or unanswered calls to be captured in a group mailbox. You might even have an IVR (“Press 1 for Sales, 2 for Support) or Time of Day routing, which automatically directs the call depending on your business hours.
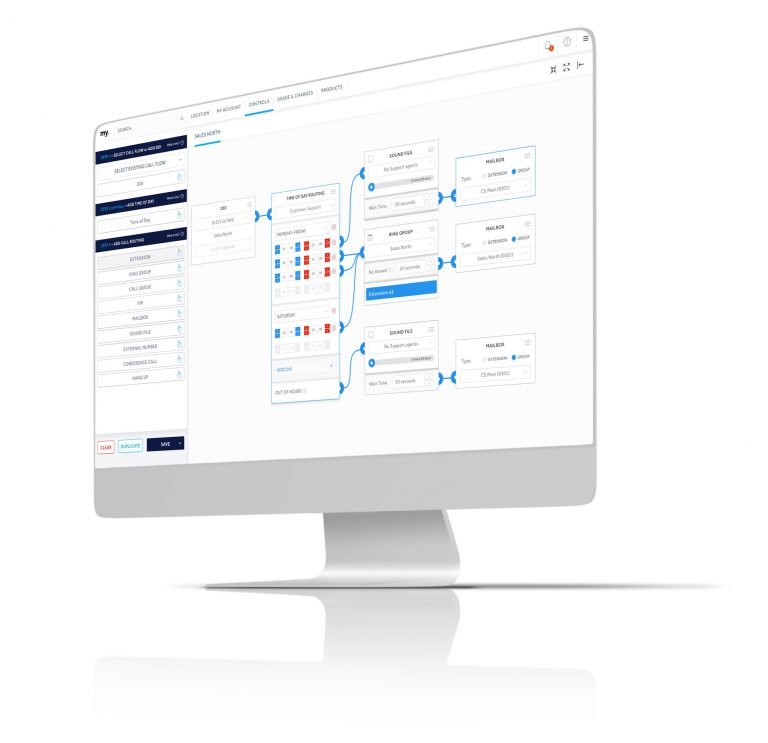
Keep it visual
—
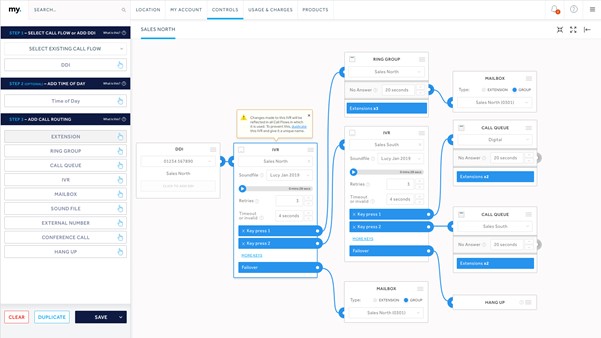
The my.plan Hosted Call Flow is visual. You can drag and drop each feature onto the Call Flow stage and link them together with the easy-to-use interface. It’s so much easier than trying to select details in a large table or unscramble a spreadsheet – each call’s journey is mapped out right in front of you.
Accessing Call Flows
—
To open the Visual Call Flow manager, log into my.plan and go to Controls > Hosted > SYSTEM SET UP > Call Flow set up via the main navigation.
IMPORTANT: Call Flow manager cannot be accessed via the my.plan mobile app
The first step
The first choice is whether to choose an existing Call Flow or create a new Call Flow.
Existing Call Flows can be selected via the drop down in the top left.
To start a new Call Flow, simply drag and drop the DDI block from the menu into the staging area, which is the big blank area that makes up the majority of the screen.
—
Connectors are used in the Call Flow to create relationships between each Call Flow feature (or card).
Connectors are only available if the cards that you want to connect are complete. In other words, all of the available information required on each card must be added.
If a connector is not showing on the right-hand side of a card, it is because it is a ‘terminating’ feature such as a mailbox, hang up or a conference call.
Once connected, the connector discs are coloured depending on the connection type:
- Grey: unconnected
- Dark blue: standard connection
- Orange: IVR connection (see IVRs for details)
- Light blue: dedicated extension (see Extensions for details)
- Purple: Microsoft Teams connection

—
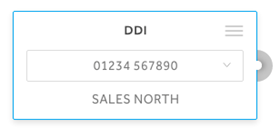
The first step for any Hosted Call Flow is the DDI – “Direct Dialling In”, which is the phone number that someone dials to connect with your business.
DDIs must be at the start of the Call Flow because it’s the only way a call can come into your business!
Once you have dropped a DDI block into the staging area, you will need to choose a phone number from the list.
You can add more than one DDI into a Call Flow… but it must be at the start of the Call Flow to connect.
IMPORTANT: Only numbers that have not already been used in a Call Flow will show in this list. If you can’t find the number you are looking for, it will be in an existing Call Flow – try looking in the selection box at the top of the screen. And remember, you can have more than one DDI in a Call Flow.
—
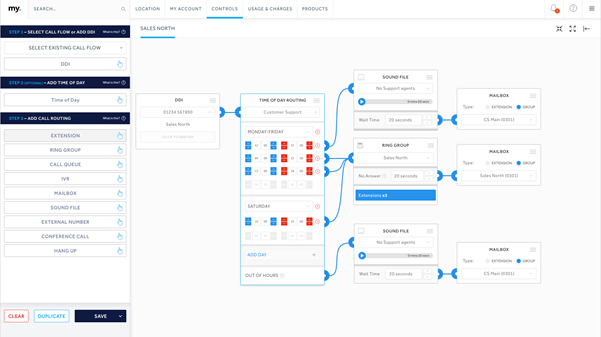
IMPORTANT: Time of Day Routing is optional. It is an advanced feature and only Gold or Platinum level extensions can be connected with Time of Day Routing. Other advanced features such as Call Queues, Ring Groups and IVRs can be connected with Time of Day Routing but likewise, these can only include Gold or Platinum level extensions.
Put simply, Time of Day Routing allows a call’s journey to change depending on when the call is made. For example, if call is made before your business is open or after it closes, you may want the caller to hear a sound file that explains your opening hours. Or you might want the call to go straight to voicemail. You might want both!
But that’s just the start of it. You might have lunch hours, or different departments with different business hours. Or different opening hours on Saturdays. Or Sundays.
Time of Day Routing is as flexible as your business.
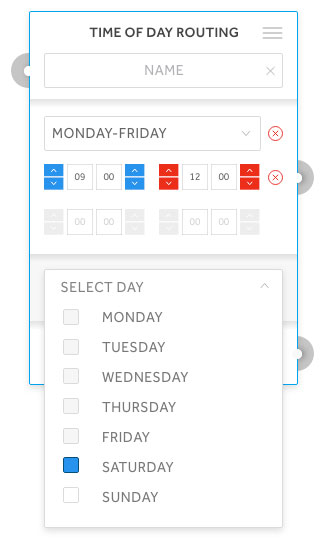
- Select an existing Time of Day Routing component or create a new one by selecting an option from the dropdown on the card.
- Choose the day(s) that you want the routing to apply to
- Select the start and end times using the selection buttons
- Add another day and time options if its applicable
Once the day and time slots are set, you will see a connector associated with each time period. These can be connected to the journey that you want the call to take within each selected time frames.
The final connector is linked with “OUT OF HOURS”. This represents any day and/or time outside of those you have defined.
IMPORTANT: You must set your OUT OF HOURS journey to complete the Call Flow.
—
Call Flow components are a range of Call Flow features that enable a caller to go directly to one destination or move through one or more steps to ensure the call is answered, information is provided, or automatically directed to the right place.
—
An extension is a word that is used a lot and in many different ways. But don’t worry… here’s what you need to know.
An extension is an internal four-digit telephone number used to make or transfer calls from one agent to another. When it comes to plan.com, each extension is linked to a tariff and to a phone.
When it comes to Call Flows, each and every Call Flow should have at least one extension!
Yes, you can have a Call Flow without an extension. For example, an incoming call could be answered by a mailbox or a sound file or a Conference Call. However, more often than not a call will be answered by an individual extension, or a group of them (see Ring Groups and Call Queues).
Extensions – dedicated
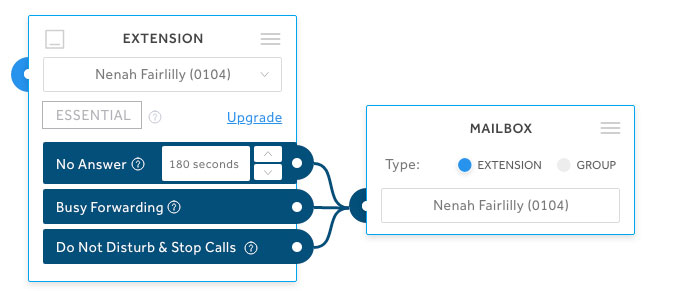
If you connect a DDI directly to an extension, this is called a ‘dedicated’ extension. In these cases, the extension card will display a few more options than if you cannot the extension anywhere else in a Call Flow.
The additional options are:
- No answer: this allows you to set how many seconds the extension should ring before moving on to the next part of the Call Flow
- Busy Forwarding: if someone is using the phone already, this connector will let you set the next event.
- Do Not Disturb and Stop Calls: People can set their phones to Do Not Disturb (DND) and through my.plan, you can select ‘Stop Calls’ to put the phone out of action. In either of these cases, this connector will let you set the next event.
In all of the above options, you can set the next steps using the Call Flow manager or through the my.plan Controls options, which you can access via Controls > Hosted > Call Forwarding. If you make a change to either the Call Flow or the Controls grid, the changes will be reflected across the account.
Extensions can be managed within a Call Flow by going to: CONTROLS > HOSTED > CALL FLOW SET UP
Extensions can also be accessed and managed via: CONTROLS > HOSTED > EXTENSION MANAGEMENT > [OPTION]
—
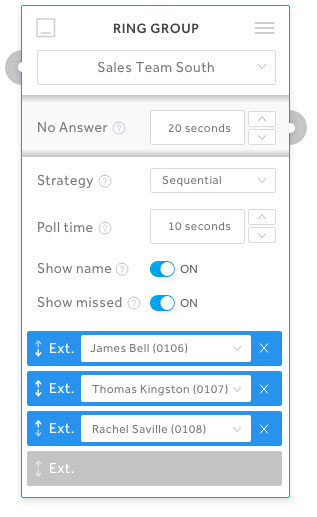
Ring Groups enable incoming Calls to be routed to an extension or group of extensions with a series of options that ensure calls are divided evenly between people.
The options are:
- Ring All: Incoming calls ring all extensions at the same time.
- Sequential: Incoming calls ring each extension for a set amount of time in a set order before moving to the next extension.
- Round Robin: The Queue starts with the person in the queue who is directly after the last person who answered a call, before moving to the next extension in the queue.
- Random: Incoming calls ring each extension for a set amount of time in a random order before moving to the next extension.
Important: Essential connections cannot be included in a Ring Group. Please upgrade to Gold or Platinum to be included in a Ring Group.
Important: Any changes made to a Ring Group that is used in a different Call Flow will be reflected everywhere the Ring Group is used. To ensure that other Call Flows are unaffected, please DUPLICATE the Call Flow using the duplicate option via the menu in the top right of the card.
Ring Groups can be managed within a Call Flow by going to: CONTROLS > HOSTED > CALL FLOW SET UP
The extensions associated with each Ring Group can also be accessed and managed via: CONTROLS > HOSTED > CALL ROUTING > CALL QUEUES
—
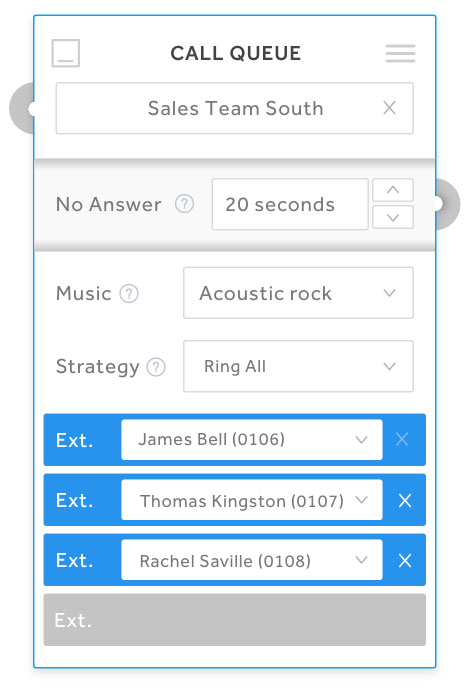
Call Queues enable incoming Calls to be routed to an extension or group of extensions in a ‘first come, first served’ basis, with a series of options that ensure calls are divided evenly between people.
- Ring All: Incoming calls ring all extensions at the same time.
- Sequential: Incoming calls ring each extension for a set amount of time in a set order before moving to the next extension.
- Random: Incoming calls ring each for a set amount of time in a random order before moving to the next extension.
Important: Essential connections cannot be included in a Call Queue. Please upgrade to Gold or Platinum to be included in a Call Queue.
Important: Any changes made to a Call Queue that is used in a different Call Flow will be reflected everywhere the Call Queue is used. To ensure that other Call Flows are unaffected, please DUPLICATE the Call Queue using the duplicate option via the menu in the top right of the card.
Call Queues can be managed within a Call Flow by going to: CONTROLS > HOSTED > CALL FLOW SET UP
The extensions associated with each Ring Group can also be accessed and managed via: CONTROLS > HOSTED > SYSTEM SET UP > CALL ROUTING > CALL QUEUES
—
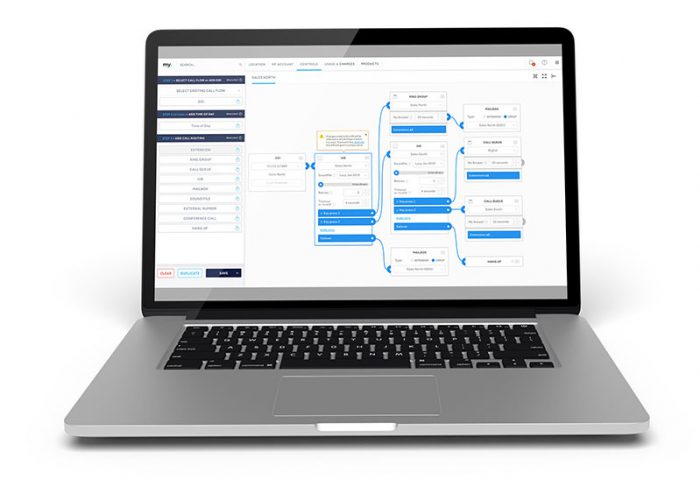
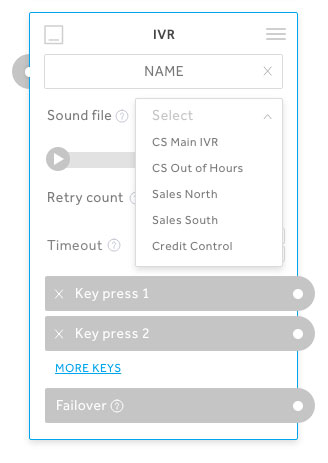
“Press 1 for Sales, press 2 for Support” IVRS are automated call features that allow you to create call flows without someone having to answer a call and transfer it to a different extension or department.
IVRs are highly configurable and allow you to set up different calling options for 12 unique keys (0-9, *, #). You can also assign a pre-recorded sound file to each IVR as well as choosing retry, time-out and failover options.
Important: Essential connections cannot be included in an IVR. Please upgrade to Gold or Platinum to be included in an IVR.
Important: Any changes made to an IVR that is used in a different Call Flow will be reflected everywhere the IVR is used. To ensure that other Call Flows are unaffected, please DUPLICATE the IVR using the duplicate option via the menu in the top right of the card.
IVRs can be set up and assigned to Call Flows by going to: CONTROLS > HOSTED > SYSTEM SET UP > CALL FLOW SET UP
—
Press 1 for Sales, press 2 for Support” IVRS are automated call features that allow you to create call flows without someone having to answer a call and transfer it to a different extension or department.
IVRs are highly configurable and allow you to set up different calling options for 12 unique keys (0-9, *, #). You can also assign a pre-recorded sound file to each IVR as well as choosing retry, time-out and failover options.
Important: Essential connections cannot be included in an IVR. Please upgrade to Gold or Platinum to be included in an IVR.
Important: Any changes made to an IVR that is used in a different Call Flow will be reflected everywhere the IVR is used. To ensure that other Call Flows are unaffected, please DUPLICATE the IVR using the duplicate option via the menu in the top right of the card.
IVRs can be set up and assigned to Call Flows by going to: CONTROLS > HOSTED > SYSTEM SET UP > CALL FLOW SET UP
—
Group mailboxes are voicemail repositories that are shared across extensions, Ring Groups, Call Queues or IVRs, and can be accessed and managed via my.plan.
Up to 200 messages can be saved at any time. If this limit is reached, no more messages will be saved. Messages can be archived at any time to ensure the limit is not reached. Messages are retained for 60 days, at which time they will be automatically archived.
Group Mailboxes can be added, modified and removed via: CONTROLS > HOSTED > SYSTEM SET UP > GROUP MAILBOXES This section allows you to play, download and archive messages in each mailbox. It also allows you to manage the PIN associated with each mailbox and manage Voicemail to Email notification settings.
Group mailboxes can also be added via a Call Flow by going to: CONTROLS > HOSTED CONTROLS > CALL FLOW Call Flows also enable Group Mailboxes to be associated with extensions and other features such as Ring Groups, Call Queues, IVRs and Time of Day Routing.
Group mailboxes cannot be associated with Essential extensions. Gold extensions require Group Mailbox bolt-on.
—
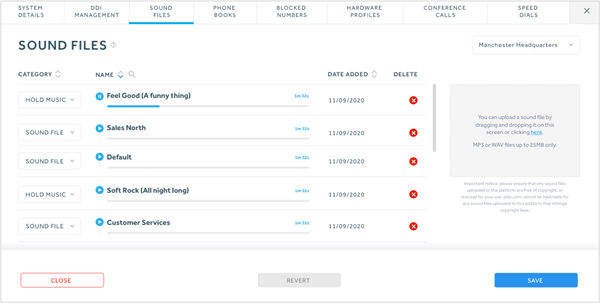
There are two types of sound file that can be managed on the Hosted Voice platform: Hold Music and Sound File.
Hold music, as the name suggests, is music that plays while a caller is on hold. A number of music files are provided by default. You can upload your own hold music to the platform. The file must be under 25MB in a .WAV or .MP3 format. You must hold the license for any music uploaded to the platform.
IMPORTANT: The Customer shall indemnify Plan, and hold Plan harmless, against any losses, damages, claims, obligations, liabilities, costs and expenses (including legal fees and any costs and expenses incurred in investigating, preparing, defending or prosecuting any litigation, claim, proceeding or demand) arising out of or in connection with any claim or cause of action arising against Plan as a result of the Customer’s use of Sound Files uploaded to the Platform.
Sound Files can be added, modified and removed via: CONTROLS > HOSTED > SYSTEM SET UP > SOUND FILES
Sound Files can be also added to an IVR or Sound File Call Flow feature via: CONTROLS > HOSTED > CALL FLOW SET UP
—
External numbers are any mobile, geographic or non-geographic phone numbers that are not managed by the Hosted platform. These can be added to the platform using the phone book via: CONTROLS > HOSTED > SYSTEM SET UP > PHONE BOOK
External numbers can be added to a Call Flow using the Call Flow manager: CONTROLS > HOSTED > CALL FLOW SET UP

—
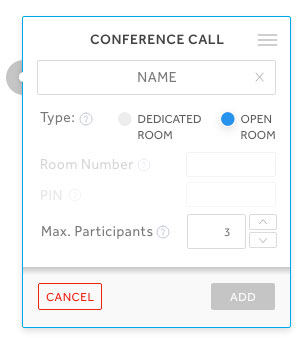
Conference Calls are phone calls that allow for more than two participants. Conference Calls are hosted in Rooms. There are two types of Conference Room: Dedicated Rooms have their own four-digit extension number and PIN, and Open Rooms allow anyone to access the conference.
There is a maximum number of participants allowed in each room at any one time. By default, this is equal to the number of extensions on your Hosted Platform +1. However, Extensions enjoying Gold and Platinum tariffs increase this number.
Conference Rooms can be created, modified and managed by going to: CONTROLS > HOSTED > SYSTEM SET UP > CONFERENCE CALLS
Conference Calls and Rooms can be set up and assigned to Call Flows by going to: CONTROLS > HOSTED > SYSTEM SET UP > CALL FLOW SET UP
Extensions can be allowed or restricted from managing Conference Rooms by going to: CONTROLS > HOSTED > CALL ROUTING > CONFERENCE CALLS
Hang up
Hang up terminates a call. Hang up can be assigned to Call Flows by going to: CONTROLS > HOSTED > SYSTEM SET UP > CALL FLOW SET UP.Hang up
—
Hang up terminates a call.
Hang up can be assigned to Call Flows by going to: CONTROLS > HOSTED > SYSTEM SET UP > CALL FLOW SET UP.

versions
What's changed?
This is the latest Hosted Call Flow guide dated 4th May 2021.
previous versions
- None